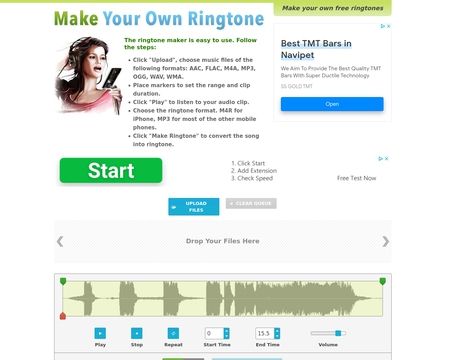
Make your own ringtone
Questions & Answers
You're most welcome. Ironically I accidentally deleted all the ringtones on my own phone so it doesn't ring at all, now! And of course it has a special cable to connect to the PC which I can't find. Sigh...
Asked by Chris O. on 6/7/2010
2 Answers

Kristi R.6/7/2010
Ok... I didn't want to write back until I actually figured all of this out, but I sat down this past weekend and finally made my own ring tone. Yipee! Thank you so much Chris for walking me through this. You are right the website has horrible instructions. I will admit it took me quite some time to create my own ring tone but now I do not have to pay ridiculous amounts of money to apple to convert audio files I already paid for into ring tones. Cheers to you Chris!

Chris O.5/15/2010
The instructions on this site, such as they are, are accurate, but poor. Like saying, to drive a car, you make the wheels go round and then make it go faster or slower and go round corners. Accurate as far as it goes, but not that helpful.
Here are some basics:
1) Find a track you'd like to make a ringtone from and store it somewhere on your computer where you can find it (In Windows, My Music is as good as anywhere).
2) On the web page, click the Upload button and wait for a selection box to open on screen. Navigate to your file, select it and click Open. Go to step (3).
If you don't have an Upload button, which should be at the far left of the screen directly above the word "EASY", then either you are running Google Chrome, which doesn't seem to be compatible yet, or you have some other issue with the Adobe Flash Player plugin for your browser. IE8 seems to work OK and for a change, better than Firefox, which crashed twice on my PC when I tried to use it with this.
3) An upload box will appear, and your file will be uploaded to the site. Be patient as depending on your connection speed, it could take a couple of minutes or more. You can watch the progress bar while you wait. Note, if the box is labeled "Downloading File" instead of "Uploading File" the upload may fail - I've had this bug. Best to close your browser and start over.
4) You should now see that the long grey window in the center of the page, which was previously empty, contains a dark grey and fuzzy-looking shape that runs from left to right, one end to the other. This is your track, turned into a graphic. The height of the shape is the volume, and the length is the time taken to play the track. You'll see that the volume is constantly changing, which is why the top and bottom of the shape are fuzzy looking. You'll also see that this window is now marked off in 15 second intervals.
5) If you're seeing what I'm describing, make sure you have your sound on and press Play to be sure you've uploaded the correct track. You'll see a red marker appear and make its way from the start of the track, moving from left to right. This is marking the place in the track that you are currently at. Then press Stop once you're ten or fifteen seconds in, the track will stop playing and that red marker will disappear.
6) You might want to get a piece of paper and a pen right now. Start the track playing, and make a note of the approximate place where you want the ringtone to start, and likewise very roughly where you want it to end.
7) Now put the mouse cursor over the sound image, near to where you want your ringtone to start, and click once. A vertical line or marker, with a little green downward-pointing arrow at the center, should appear where you clicked. If this doesn't happen and you can't make a marker appear anywhere by clicking on the sound, you've got a bug. Refresh your browser and start your upload again. You have to be able to see the markers, for this to work. Note, the editing markers are different from the red line, which just shows you where you are in the track when it's playing.
8) Now put your mouse cursor roughly where you think you want the ringtone to end, and click once. This time a marker with a little black arrow pointing up in the center should appear, and the space between the markers should turn grey. This selection is your first attempt at chopping a ringtone out of your track.
9) Now you can fine-tune this by moving the markers around, putting your mouse cursor on the little arrows, holding the left button down, and dragging the markers to the left or right. As you do this, you'll see the "selected duration" and "selected portion" figures change. They aren't really important but you might like to know them anyway. Take your time, you can make as many changes as you like.
10) Each time you move a marker, press the "Selected" button and you'll hear the part you've selected. The "Undo" and "Redo" buttons are self-explanatory. The "Repeat" button is a toggle which makes your selection loop around until you click on the button again.
11) When you are happy with your selection, make a note of those figures showing the duration and position. You won't need them this time, but they may come in very useful another time. Now move down the page. Firstly select the file type you need, my phone uses MP3, some others use other formats, you need to know or get it from your user manual. Then select the "bitrate" you want - the lower, the poorer the quality of the sound but the smaller the file. 96 is portable radio quality, 160 is fairly good, 320 is excellent. If you choose a bitrate higher than the track you uploaded was made with, you'll get an error message later and you can simply pick a lower figure. I'd pick 160 to start with and see how it goes, and if you're happy with that quality on your phone.
12) Choose whether you want the file sent to your computer, your cell, or your email. I've only used the first option, pick one of the others and you're on your own until someone else posts here and tells us whether they work OK.
13) Leave the "Normalize" box ticked for now. Most people will find this works as it is.
14) Leave the "Fade" box unchecked for now. If you select this, you can play around with fading the start of the ringtone in, and fading it our again at the end, but let's get a basic ringtone that works, first. We can play later.
15) Click the Make A Ringtone button. The screen will darken for a moment or two, then you should get a "Success" window telling you that the ringtone is ready. And there will be a player there too so you can listen to it. At the bottom of that window is a standard text link, which you'll use to download the ringtone file to your computer in the same way you'd download any other kind of file from the web.
If you don't like what you hear, you can close this window with the ESC button on your keyboard, and you'll still have the page there and you can go back and mess with your track again.
The way you install a ringtone on your phone depends on your phone. I just drop an MP3 into a "ringtones" folder of my Sony Walkman phone, and I'm done. You need to check your phone manual. Perhaps anyone else using this service will be kind enough to let us know how to install the files on their phones.
That should get you a basic ringtone, but if you want to start experimenting with the advanced, or expert features some other time, you can upload the ringtone you've just made and mess around with it to your heart's content. Or if you have to upload the whole track again, the figures you wrote down earlier will show you exactly where you cut the ringtone from.
Of the "advanced" options, I'd go for playing with the bass and treble to start with. Unless you understand them, ignore the technical texts. Even the language of the drop-down menus could be a little more user friendly, but you can get the drift and play around. And if you want, you can then change the speed of the track, or play it in reverse if that seems like something you'd enjoy as a ringtone. Don't forget that all the edits and effects are non-destructive, which means that your original file is still saved exactly as you uploaded it. If you get in a total mess with the Advanced or Expert options, hit "RESET" and you should get your original file back.
The Expert options are mainly special effects, which are going to be very much a matter of personal choice. If you don't know what the titles mean, just play with the effects and see what they do. In most situations, you aren't going to use a single one of these, but they can be fun.
Add your answer
Click to upload/insert
or drag & drop